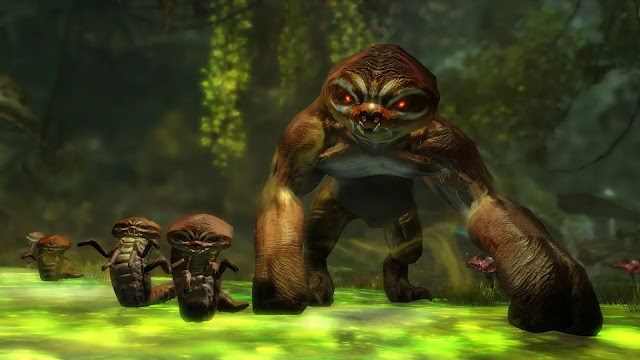
Slothasor is a boss encounter and the first encounter of the Salvation Pass raid wing.
TL;DR
- You’ll need up to four players to handle mushrooms. They eat an Imbued Mushroom and use the transformation to eat Poison Mushrooms in a path counterclockwise around the arena.
- Avoid standing on uncleared poison.
- Be careful not to kill allies transformed into slublings.
- Slothasor randomly selects a tank to follow around and target with attacks. They should face it away from group and lead it forward along the cleared path.
- When Slothasor pounds the ground, wait for three AoEs to appear under each person, then block or dodge.
- When someone gets a SAK and a skull icon over their head, they should move to the wall behind the group and use the SAK to drop the Volatile Poison.
- At every 20% interval and again at 10%, Slothasor will stop and take a nap until it’s CCed. Stab, aegis, or stunbreak the fear that comes right after.
- Spam dodges and condi cleanse to survive when it uses Spore Release starting under 50%.
- Cleave down Slubling adds, whose projectiles can corrupt boons. Use pulls to drag them to the group if you can.
Table of Contents
Utilities & Special Roles
This fight requires a large amount of CC, as Slothasor gains a defiance bar frequently. Pulls in particular can also be helpful to drag slubling adds to the group.
Stability, aegis, or stunbreaks must be used to prevent the squad from being feared by Narcolepsy, which can lead to otherwise unavoidable deaths.
Condition cleanses and burst healing can be very useful for dealing with Spore Release (shakes). Revival effects can also be good to have, as it’s very easy for players to get downed in this fight, and reviving normally can be difficult if the fallen player is sitting in poison.
Mushrooms
The floor of Slothasor’s arena is covered in green poison AoEs which will quickly kill players. Each patch of poison is attached to a red mushroom at its center. Players must utilize Imbued Mushrooms to eat these mushrooms and clear a safe path through the arena; see the core mechanics section below.
Most groups will assign four players to handle mushrooms, one assigned to each spawn in order. Due to a debuff applied after eating a mushroom, a player can’t eat again until the arena has gone in a full rotation and they’re back at the same mushroom, thus requiring a different player to be assigned to each. Some groups may assign fewer mushrooms, as it’s possible to skip the third and fourth with good enough DPS.
This role is usually handled by DPS players, since the fight has a lot of damage pressure to keep healers on the boss. More advanced groups may have their healer(s) do mushrooms in order to maximize DPS uptime.
Core Mechanics
Poison Mushrooms & Imbued Mushrooms

Spread across Slothasor’s arena are red Poison Mushrooms, each of which is surrounded by a patch of green poison goop which functions as a continuous AoE. This floor poison deals very heavy damage and will quickly kill the group if not dealt with.
At the very front of the arena, and in three other set locations, are glowing blue Imbued Mushrooms. The mushroom disappears when it is interacted with (eaten), and a new mushroom spawns every 50 seconds. Including the first, the order of spawns goes: North → West → South → East → North, rotating counterclockwise.
The player who eats an Imbued Mushroom will be transformed into a slubling for up to 45 seconds, or until the player ends the transformation manually or is downed. While transformed, a player’s usual skills are removed; in their place, they gain the Eat skill. Additionally, the transformed player is swapped to the other team for the duration of the transformation—from their perspective, Slothasor and its slubling adds will become friendly NPCs and stop attacking them, while the squad will become enemies; from the rest of the squad’s perspective, the slubling player will become an enemy.
The transformed player is targetable and can be very easily killed by the squad if they aren’t careful. They have 50k max HP while transformed, but will be at the same percentage of their max health as they were before transforming.

When a transformed player uses their Eat skill while standing on a Poison Mushroom, it will be eaten and disappear, along with its poison AoE, for 1 minute, after which it will respawn and the surrounding area will become dangerous again.
Upon eating an Imbued Mushroom, a player gains the Nauseated debuff for 3:15 minutes. This debuff prevents them from eating another Imbued Mushroom until it wears off, and is why there are generally four players assigned to handling this mechanic.
Solution:
Avoid standing in the AoEs of Poison Mushrooms whenever possible. If forced to cross poison, use movement skills to get across as quickly as possible.
Before the fight begins, assign four players to eat specific Imbued Mushrooms. When their mushroom spawns, they should leave the group, eat it, and then eat 2-5 Poison Mushrooms in a path leading towards the next Imbued Mushroom’s spawn location. See the strategies section below for more details on mushroom-eating paths.
The rest of the squad should be very careful to avoid killing the slubling player while they are transformed. Large AoEs, piercing projectiles, and CC effects are of particular concern. If the slubling is downed before they eat all their mushrooms, quickly revive them and remain in the safe area as long as possible, then prepare to try and outheal the floor poison as you wait for the next slubling.
Tanking/Fixation
When the fight begins, Slothasor will fixate on a random player who isn’t transformed into a slubling. The fixated player acts as the tank, with Slothasor chasing them and aiming its basic attacks towards them.
Slothasor will change targets and fixate on a different non-slubling every 30 seconds. It will change target immediately if its fixation is downed, killed, or eats an Imbued Mushroom.
When Slothasor fixates on a player, they will hear a ping sound cue. A purple icon will appear above their head and remain until Slothasor fixates on another player. Additionally, a message in small red text will appear on your screen: “An enemy is fixated on you.” A broadcast in larger text will be displayed to all players: “<Player> is currently fixated.”
Solution:
If you become fixated, move to the opposite side of the boss as where the group is standing in order to aim its auto-attacks and Halitosis away from them. Lead Slothasor forward through the safe area cleared by slubling players, but do not get too close to a player who is still transformed.
If Slothasor uses Halitosis, it will stop moving or turning. This attack can be quite dangerous, so you may want to move to the side or behind Slothasor until it ends.
If you aren’t fixated by Slothasor, make sure you remain behind it whenever possible to avoid being hit by its auto-attacks or Halitosis.
Volatile Poison
Volatile Poison, also often just called poison, big poison, or SAK, is an effect applied to a random non-slubling player every 25 seconds, with the first application at 6:35 on the timer. Players with the effect suffer a flat 750 damage per second.
When the effect is applied to a player, they will hear a ping audio cue, and a green skull icon will appear above their head and remain there until the effect is removed. They will also gain a Special Action Key skill (Purge), and red text stating “Volatile Poison” will appear on their screen.
Volatile Poison will activate 8 seconds after it is applied. It will also activate early if the player it’s applied to is downed or eats an Imbued Mushroom. When it activates, an AoE circle is created beneath the player which will does heavy damage and will gradually expand until it disappears after about 85 seconds. By the time a Volatile Poison field has fully expanded, it is about a third as large as the arena. Up to four poison fields can be active at a time.
Solution:
In the standard strategy, players should place Volatile Poisons against the arena wall and behind the group to minimize the area that it covers as it expands. You may have to cross Poison Mushrooms in order to do so; movement skills and self-sustain can be helpful here.
The squad should avoid standing in Volatile Poison at all costs. Ensure that the fixated player moves Slothasor away from expanding fields and that slublings create a safe path for the squad to take forward.
If you are assigned to a mushroom and have a Volatile Poison when it’s your turn, prioritize placing the poison in a good spot before doing your mushroom; if possible, make sure this is communicated to your squad. If a poison is placed poorly near or on the group, such as due to a player going down, the group must move away ASAP.
Tantrum
Tantrum, sometimes also called coconuts or falling rocks, is an attack where Slothasor pounds its fists on the ground. It will spawn a series of three small, circular AoEs under each non-transformed player’s feet at a rate of one AoE every ~.5 seconds. After all the AoEs have spawned, they will then activate, dealing damage and knocking down any player hit for 5 seconds.
Since there are three AoEs per player, there can be up to thirty AoEs. Getting hit in a stack of AoEs is almost guaranteed to down a player. Tantrum will not kill a player who is not already downed. The attack can be blocked, dodged, or invulned.
The hitbox of the AoEs remain active for a deceptively long amount of time. Even if you successfully dodge your own AoEs, dodging into someone else’s AoEs may result in you getting hit after your evasion ends.
Slothasor will always use Tantrum for the first time very shortly into the battle at 6:45 on the timer, and will repeat it roughly every 45 seconds.
Solution:
Groups will generally remain stacked in place when the attack begins, to decrease the area covered by AoEs. After the third set of AoEs appears, run off the stack, use a channeled block, or dodge to avoid being hit.
If everyone stacks perfectly, it can be difficult to tell the timing for the dodge. Remain slightly spread, delegate one player to remain slightly off-stack, or use a countdown instead of watching the AoEs.
If the group is spread out when Tantrum begins, pay careful attention to other players’ positions and dodge away from them.
Halitosis
Halitosis, also called fire breath, is a cone-shaped AoE without an AoE indicator. Slothasor will halt in place, facing the direction of the fixated player when the attack began, and breath fire for eight seconds, dealing significant damage and applying burning each second.
Just before Halitosis activates, Slothasor will lift its head up, and a white fog will appear around it. Since there is no AoE indicator, watch for this to know when the attack will begin.
Solution:
When you aren’t fixated, stay behind Slothasor to avoid being in the path of Halitosis. If it’s aimed at you, either sidestep it or run behind Slothasor (dodging through it, if necessary) until the attack ends.
Narcolepsy & Fear Me!
At every 20% HP interval, and a fifth time at 10%, Slothasor will stop in place, gaining the Narcolepsy effect. While this effect is active, it is immune to all damage and will cleanse all conditions that were one it. New conditions can be applied during Narcolepsy, but they will not deal damage until the effect ends.
Once Narcolepsy begins, Slothasor will play an animation where it lies down to sleep, which takes a couple seconds. Once this animation completes, it gains a 4,000-strength defiance bar. Slothasor will remain stationary and invulnerable for up to two minutes, or until its defiance bar is broken.
Breaking the bar causes Slothasor to wake up and lose Narcolepsy. It will then use Fear Me!, inflicting fear on the entire squad for 10 seconds. This can be blocked using aegis, stability, or a channeled block. Otherwise, a stun break or condition cleanse can be used to stop the fear effect. To save yourself with a condi cleanse, it must have an instantaneous cast time.
Solution:
Ensure the fixated players keep Slothasor moving at a good pace so that the floor does not become poisoned beneath it while it is asleep. Wait until its animation finishes, then break its defiance bar as quickly as possible.
Some squads may have a specific player(s) bring group-wide stability, aegis, or stunbreaks in order to deal with Fear Me!. Otherwise, ensure you bring your own form of protection.
If a player isn’t freed from the fear, they will likely run out into the poison and be downed. Reviving normally can be risky and result in additional deaths. Use ranged and/or instant revival effects (a Warrior’s Battle Standard or a Mesmer’s Medic Feedback) to get players up if possible. If you lack these options, it may sometimes be best to abandon a feared player to their fate.
Slublings
Throughout the fight, groups of four Slubling adds will spawn every 30 seconds. As the fight goes on, the rate of spawning increases, first to every 20 seconds when the timer is below 4 minutes, then to every 15 when the timer is below 2 minutes. After Slothasor enrages, slublings no longer spawn.
Slublings come in a total of four variants, two melee and two ranged, and each group of four contains one of each; there is no way to distinguish between these variants visually, but the differences are minor and don’t matter much. The melee slublings will apply either bleeding and slow or torment and cripple; the ranged slublings will apply either poison or burning, and both are capable of corrupting boons.
In addition to slubling spawns becoming more frequent as the timer progresses, they also become more dangerous once Slothasor is below 25% HP. When a group of slublings spawns after that point, they will immediately transform into Evolved Slublings. These are more powerful, and their boon-corrupting projectiles cannot be destroyed or reflected.
Common Misconception:
You may have heard that slublings will eventually transform into evolved slublings if left alive for too long, but this is untrue; slublings will only evolve if they spawn while Slothasor is below 25% HP.
Solution:
Though your main focus should be Slothasor, cleave down slublings whenever you get the chance. This can be accomplished by using a pull to drag them onto the group or by utilizing the center strat; see additional details in the strategy section below.
Projectile hate can be useful to prevent slublings from corrupting boons, though this will not work on the evolved slublings at the end of the fight. It may be good to avoid applying stability to yourself or others throughout the fight, as this will corrupt into fear, which is particularly bad.
Phases & Additional Mechanics
The encounter begins when a player eats the first Imbued Mushroom. Slothasor lacks defined phases or phase transitions, though Narcolepsy functions similarly to a split phase.
Below 50% HP — Spore Release
Slothasor gains one new mechanic below this threshold: Spore Release, often called shakes or coconuts. It will use this attack roughly every 45 seconds from 50% onward.
When Slothasor prepares to use Spore Release, it will lower its head; this animation can help you to identify it ahead of time. The attack sends two waves of many arcing projectiles towards nearby players, each dealing damage and applying five stacks of bleeding, burning, poison, and torment. The conditions from just a single projectile can kill you very quickly.
Spore Release’s projectiles cannot be reflected or destroyed, but they can be blocked, dodged, or invulned.
Solution:
When Spore Release begins, either used a channeled block or invuln to protect yourself, or dodge twice in a row to avoid the two waves of projectiles. By dodging into and then out of Slothasor’s hitbox with the right timing, you can best avoid the arcs of the projectiles; additionally, you may protect other players by eating some of the projectiles with your dodge frames.
Below 25% HP
Starting at this threshhold, Slublings are ramped and will now transform into more dangerous Evolved Slublings immediately after spawning. There are no other changes.
Enrage
The boss’s enrage timer is 7 minutes. When it becomes enraged, it gains 200% increased outgoing damage, and Imbued Mushrooms stop spawning. Additionally, Slubling adds also stop spawning.
Strategies
Mushrooms
There are three main strategies for dealing with Poison Mushrooms: outer, inner, and no mushrooms.

Outer/Wall Strat
For this strategy, slubling players eat mushrooms in a wide circle, sticking near the wall of the arena.
The specific route here isn’t important, and you could utilize several variations of it; the core point is that you select paths that keep players near the walls, allowing them to much more quickly and safely drop off Volatile Poisons.
This strategy can be safer, especially for new groups that struggle to deal with Volatile Poison or have low healing, but is generally slower, and can cause greater difficulty near the end of the fight when Evolved Slublings begin to spawn.
Inner/Hourglass Strat

For this strategy, slubling players instead eat mushrooms in an hourglass shape that curves from their Imbued Mushroom, inward towards the center, and then out towards the next Imbued Mushroom location. More advanced groups may not even clear a path to the next mushroom, instead only clearing Poison Mushrooms in the center of the arena.
Once again the specific route here isn’t very important, and there are several variations; the core point is to select paths that keep players near the center, allowing them to cleave down Slublings as they spawn and reducing the overall amount of movement required.
| Outer/Wall | ||
| Inner/Hourglass |
No Mushroom Strat
With this strategy, one player eats the first Imbued Mushroom in order to start the fight and immediately cancels the transformation, and the group ignores all future Imbued Mushroom spawns, instead choosing to simply outheal the Poison Mushrooms.
The starting location of the arena starts out safe, so the group can remain there without issue until Poison Mushrooms grow. Around the edges of the arena are a couple other tiny safe spots where no Poison Mushrooms reach; these can also be utilized in place of healing, though this severely limits your ability to move and deal with the fight’s other mechanics, so outhealing Poison Mushrooms is often preferable.
The AoEs of Poison Mushrooms tend to overlap at their edges, so when utilizing this strategy it’s important to stand near the center of the AoE to ensure you aren’t being hit by multiple; you can use the red mushroom itself as an indicator. This strategy also makes Volatile Poisons less punishing; since you’ve committed to standing in and outhealing Poison Mushrooms anyways, the group can simply move to a different section of the poisoned floor to avoid a poorly placed VP. Mobility effects such as blinks and portals should be used to place VPs in good locations, ideally allowing the group to stay in the center.
Similar to the inner strat, you generally want to stay near the center of the arena in order to cleave down Slublings and Evolved Slublings as they spawn.
Pros:
- This strategy has the highest DPS potential by far thanks to a general lack of movement, the fact that nobody’s spending time as a slubling instead of DPSing, and the fact that the group doesn’t ever need to hold back damage to avoid killing a friendly slubling.
- Like the inner strat, the group can easily cleave down Slublings as they spawn.
- Volatile Poisons are less punishing, since the group can freely move to any part of the arena if necessary.
- If things go catastrophically wrong, nothing stops the group from swapping mid-combat to a standard mushroom-eating strategy.
Cons:
- This strategy has very high heal pressure to the constant heavy damage dealt by Poison Mushrooms.
- Since heal pressure is already high, failing any other mechanic can easily result in a down, which can be difficult to recover from while standing in poison.
- The proper locations to stand to avoid getting overlapped by multiple Poison Mushrooms are indicated only by small mushroom objects which can be difficult to see in a mass of players and skill effects, making it easy to choose the wrong spot and get yourself killed.
Slippery Slubling
Slippery Slubling is the only additional achievement tied to the Slothasor encounter. Completing it also progresses the ‘Salvation Pass Sadist’ achievement. You are ineligible for Slippery Slubling while the group is benefiting from Emboldened.
Ensure that someone in your raid squad is holding the golden slubling so that it may witness the death of Slothasor.
This achievement can be quite difficult and must be activated separately before the encounter begins, similar to a Challenge Mode. To activate it, interact with the Golden Slubling on the right wall just before the Slothasor arena and select ‘Shoo it away.’ Doing so will cause a golden mushroom to grow in the center of the arena.
A player transformed into a slubling can use their Eat skill to consume the golden mushroom while standing on it, similar to the encounter’s Poison Mushrooms. Doing so will instantly end your slubling transformation, so clear a path first. When your transformation ends, you’ll be holding the Golden Slubling as a bundle. The golden mushroom will despawn after 30 seconds, so the first slubling player must be the one to eat it.
Carrying the Golden Slubling bundle replaces your weapon skills with a single skill, Toss, which is a ground-targeted AoE. Using this skill will remove the bundle and toss it in an arc towards the target location, which is indicated by a white circle. If it lands on another player, they will catch it and obtain the bundle.
Upon receiving the Golden Slubling, either by eating the golden mushroom or by catching the bundle, you gain the Slippery Slubling effect, represented by the typical ‘achievement eligibility’ icon, which lasts for 30 seconds. If this effect expires while you’re holding the slubling, it escapes and the achievement is failed; dropping the bundle normally also fails the achievement, so you must use Toss to pass it off to someone else.
Slippery Slubling is stripped upon tossing the Golden Slubling. It’s impossible to catch the slubling from your own throw, but there is no required wait before you can hold it again. As such, the best strategy is to designate one player as the slubling carrier and another as their assistant. When Slippery Slubling is about to expire, both stack together away from the group. The carrier tosses at their feet to pass to their assistant, and the assistant then tosses back to them; in this way, a single player can spend most of the fight carrying the slubling.
The slubling carrier should be a player who can fulfill their role in the squad well without weapon skills, usually a boonDPS or healer. They may also want to bring their own stunbreak for Fear Me!, since there’s a chance they may be forced to be standing off the group for a slubling transfer when this occurs.
Alternative Guides
Don’t jive with the way the information is presented here? Here are some alternatives:
Leave a Reply